What is a Pentatonic Scale?
So what is a Pentatonic Scale?
This article will help you understand more about the Pentatonic Scale including where it comes from and why we use it.
I’ve written a brief summary article and also a full detailed version for you to dig in to later!
Summary
In the full article I’ve covered the following:
- What are musical scales?
- What is the Chromatic Scale?
- The difference between major and minor scales
- What are musical intervals?
- Major scale intervals
- Minor scale intervals
- What is a Pentatonic Scale and where do they come from?
- Some commonly used Pentatonic scales
Pentatonic scales are a simplified version, or selection, from the wider full scale, whether it be major or minor.
They tend to be used by beginners as they are easier to make sound good over chord progressions and you don’t need to remember as many notes as the full scale.
The order of notes that are played define the sound that they will make.
The Major Pentatonic Scale is 5 notes from the wider major scale namely notes 1, 2, 3, 5 and 6.
The Minor Pentatonic Scale is 5 notes from the wider natural minor scale namely notes 1, 3, 4, 5 and 7.
The most common pentatonic scales are major and minor but they can be related harmonically and even contain the same notes such as C Major Pentatonic and A Minor Pentatonic.
I’ve got more detail about musical scales and guitar chords that you must know in my free Online Guitar Academy.
CLICK HERE TO JOIN NOW!
Please read on to the full article for more detailed information, graphics and some guitar neck diagrams to help you learn about some of the most common pentatonic scales there are.
Main Article
Before we get into what a Pentatonic Scale is, I want to lay down some basics first.
What are Musical Scales?
Musical scales are a grouping of notes that relate to each other and give a distinctive sound when played in sequence or when a certain selection is played together.
In music, you only need to know one scale and then everything else comes from that scale.
So, what scale is this? It’s the Chromatic Scale.
Chromatic Scale
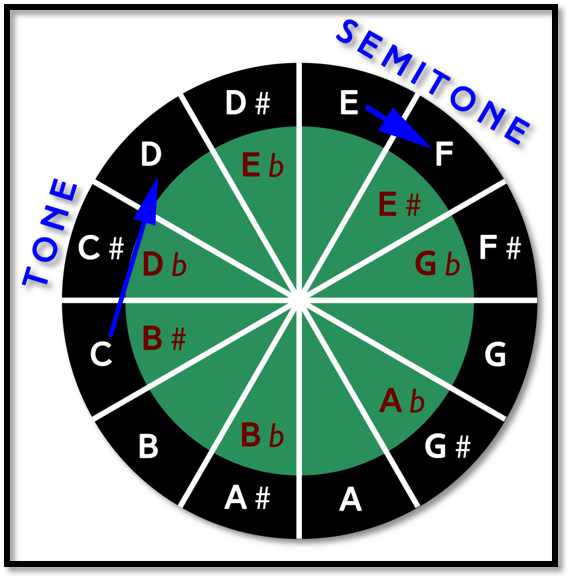
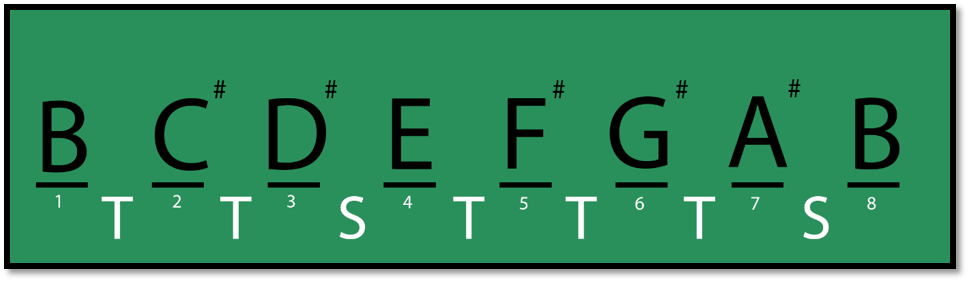
The Chromatic Scale contains all the notes that we can play in music.
There are a finite (limited) number of notes (12 in total) within the Chromatic Scale as shown below.
The ‘#’ symbol indicates a sharp note and the ‘b’ symbol represents a flat note.
It’s not important to know the exact reasons for these, in the initial stages of guitar; which I’m guessing you’re at if you’re wondering what pentatonic scales are.
You just need to know they exist and be aware of them.
Sharps (#) and flats (b)are interchangeable for certain notes i.e. A# is the same as Bb in that is the same note.
However, they have different meanings depending on the scale they are in.
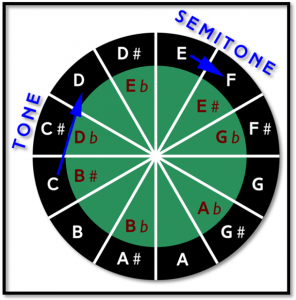
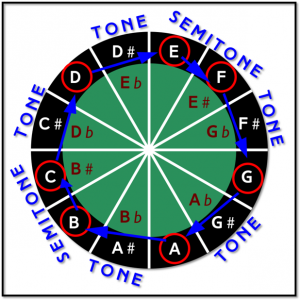
It’s an important concept to grasp that musical notes in the Chromatic Scale are not linear (i.e. in one line) but circular in a continuous pattern; increasing in pitch with no start or end.
But there can’t be just one scale I’ve heard of major and minor scales!
That’s right but all the other scales still use the Chromatic Scale. It’s just a matter of the order you hear the notes and the spacing between them.
For example, the major scale is a selection of notes from the Chromatic Scale with a standardized space between them called intervals.
What are Musical Intervals?
A musical interval is the spacing between notes when played in order or together but what does that mean?
The Chromatic Scale goes up in “semitones” (the smallest interval between notes).
The easiest way to remember this is the change in pitch when you move up or down by one fret on the guitar; this is a semitone.
Try doing this on your guitar, so you get an idea of how this sounds.
The next most common interval is the “tone” (sometimes known as whole note).
This is easy to remember as it is a spacing/interval of two semitones. Just think of it like a circle, i.e. two semi circles make a circle and so two semitones make a tone.
A musical scale is made up of a combination of a mix of tones and semi tones; depending on the type.
Just know that if you remember the Chromatic Scale you won’t go far wrong.
It might seem that there are so many scales that you don’t know where to even start learning and remembering them.
All a musical scale is, is a selection of notes from the Chromatic Scale played either in order (traditional scale/arpeggio) or a chord (notes played at the same time).
Each type of scale has a different interval pattern between each note i.e. for major and minor. It’s easiest to initially think of the major scale pattern when you first start learning this.
Major Scale Intervals
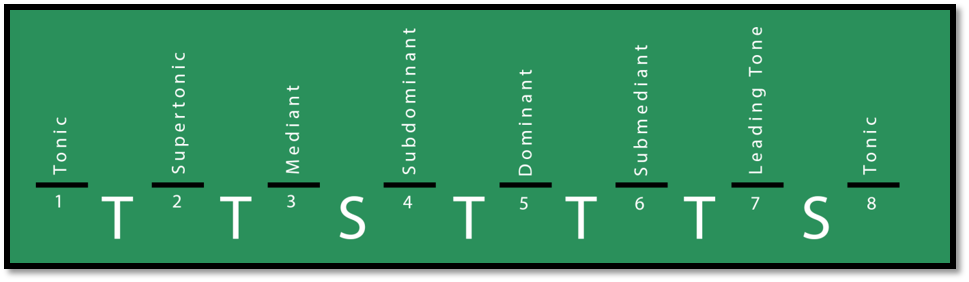
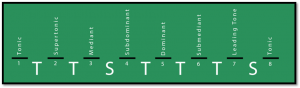
The intervals for a major scale, starting from the root, are: Tone; Tone; Semitone; Tone; Tone; Tone; and Semitone.
Each note in the scale is also given a reference name which are the ‘Scale Degrees’ i.e. Tonic, Supertonic etc.
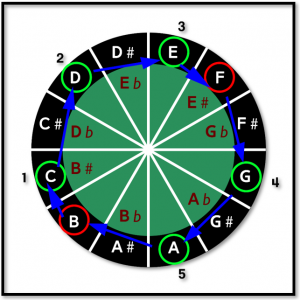
The diagram below shows the different intervals between notes in the major scale and the names of each of the notes i.e. Tonic, Supertonic etc.
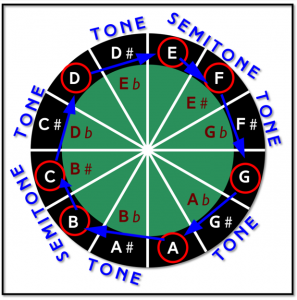
As an example, the below diagrams show the C Major Scale notes and the intervals between the notes along with them over the chromatic scale wheel.

What is the difference between Major and Minor?
The main difference between major and minor chords and/or scales is the sound they make.
Major scales/chords are very pleasant and happy sounding whereas minor scales/chords have a moody sound.
Even though there’s such a huge difference in emotion and sound between major and minor, there’s a very small technical difference between them.
Let’s go through this.
Why do Major and Minor Sound different?
So why do minor scales sound different to major scales?
It’s because there are different intervals between the notes.
If you remember from above, we covered the Chromatic Scale and that we only have a total of 12 notes to choose from.
There are no more and no less. It’s all we’ve got, sorry.
We take a selection of the notes from the Chromatic Scale to make a major/minor scale. But the intervals (spacing between notes) are different for each.
Let’s look at the Minor Scale now to see how major and minor differ.
Minor Scale Intervals and Pattern
The intervals for this minor scale (known as the Natural Minor Scale), starting from the root, are: Tone; Semitone; Tone; Tone; Semitone; Tone; and Tone.
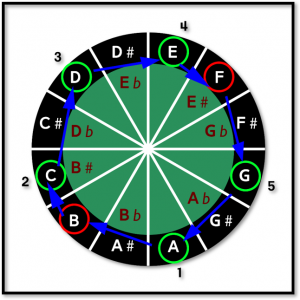
The diagram below shows the different intervals between notes in the major scale and the names of each of the notes i.e. Tonic, Supertonic etc.
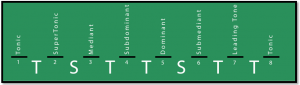
As an example, the below diagrams show the A Minor Scale notes and the intervals between the notes along with them over the Chromatic Scale wheel.

You can see that the notes in the C Major and A Minor Scale are the same. This shows that it is just the order that the notes are heard that makes them have a different sound.
What is a Pentatonic Scale?
The Pentantonic Scale is talked about a lot in guitar playing, especially among beginners/intermediate guitarists.
This is because the Pentatonic Scale is a simplified version of other scales.
The most common forms are the Major Pentatonic and Minor Pentatonic scales.
So, what is the Pentatonic Scale?
It’s essentially a selection of 5 notes from each respective scale within one octave.
Major Pentatonic
The selection of notes with respect to the wider major scale is given below:
Root – Second – Third – Fifth – Sixth
The Major Pentatonic Scale is taken from the Major Scale and the Minor Pentatonic Scale is taken from the Natural Minor Scale.
Minor Pentatonic
The selection of notes with respect to the wider minor scale is given below:
Root – Third – Fourth – Fifth – Seventh
Where do Pentatonic Scales Come From?
Pentatonic Scales are believed to date way back to the ancient Greek period to even predate Pythagoras (500 BC).
Simple musical instruments were made and tuned to the Pentatonic Scale for a few reasons but essentially the number 5 was believed to have cultural significance.
Pentatonic Scales are used commonly as they tend to fit well when played randomly as they lack the more complicated dissonant intervals.
Common Pentatonic Scales
The most commonly used versions of these scales in guitar playing are the C Major and Minor Pentatonic.
These scales are harmonically related, so we’ll go through those now.
C Major Pentatonic Scale Wheel
A Minor Pentatonic Scale Wheel
Notice that the notes in both C Major Pentatonic and A Minor Pentatonic are the same, as per the wider full scales.
The different sound comes from the order they are played in and therefore the intervals between each note.
Starting on C and playing through the pentatonic scale sounds different to starting on the A note and playing through.
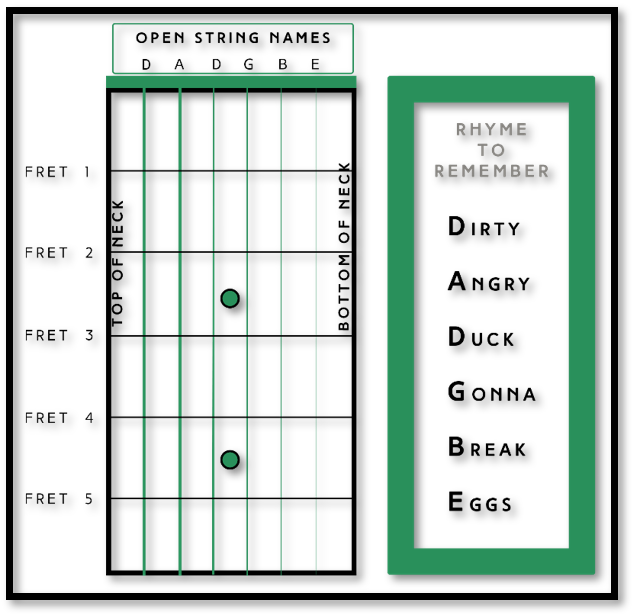
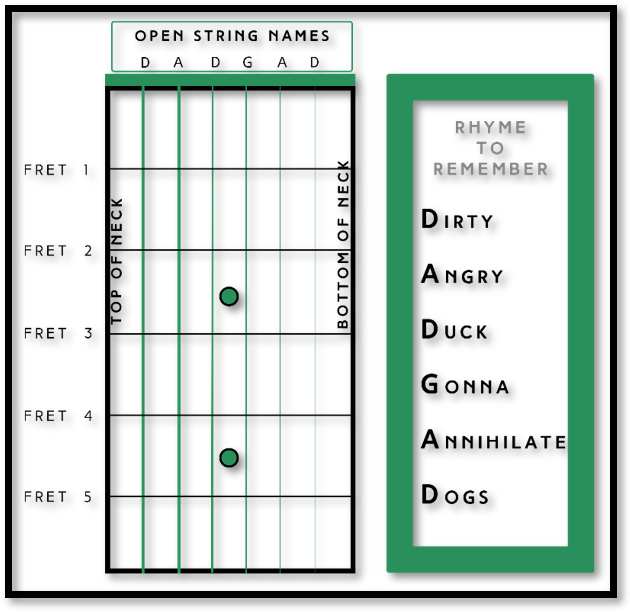
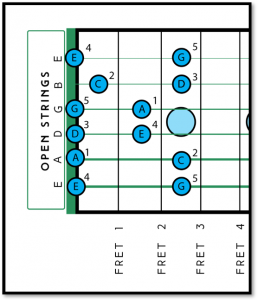
I’ve also given some example neck diagrams for the C Major and A Minor Pentatonic Scales.
C Major Pentatonic Scale Guitar Neck Diagram

A Minor Pentatonic Scale Guitar Neck Diagram
For further reading and improving your knowledge you can find and explore other Pentatonic Scales such as the Egyptian Suspended Pentatonic, Blues Minor Pentatonic, and Blues Major Pentatonic.
I hope this article helped you to understand more about the elusive question of “What is a Pentatonic Scale?”. I could carry on further and, in more detail, but thought this was a good place to stop for now.
I also have lots of free guitar lesson guitar available when you subscribe to the Fret Success Academy.
CLICK HERE TO JOIN NOW!
Thanks,
Dan
(Founder)


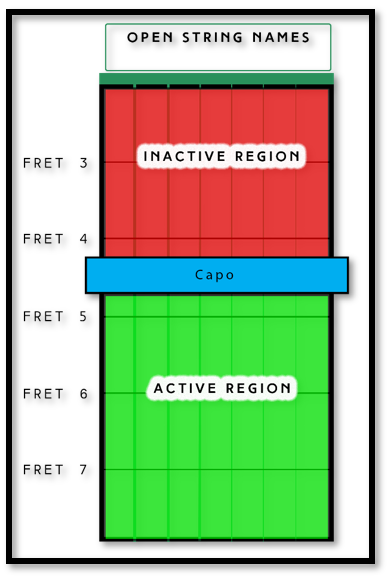
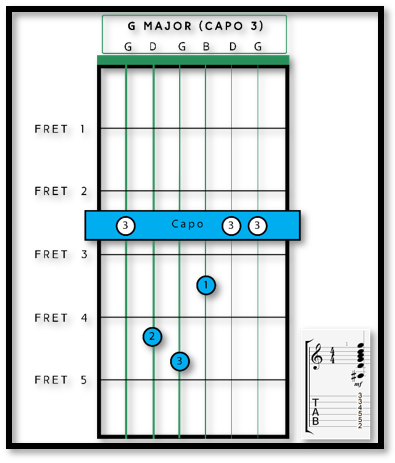
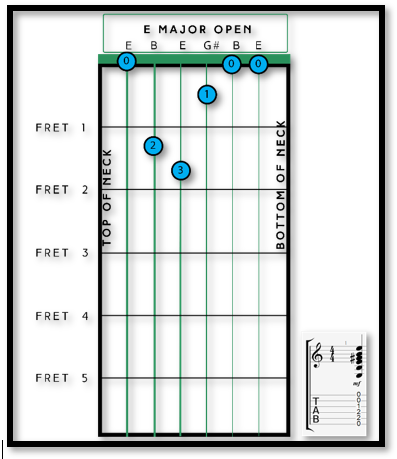 For example, if we want to move our chords up by 3 semitones then we would place the capo on the 3rd fret of the guitar to correctly shift the open strings to the desired relative tuning. If we form an E Major Open Chord shape in this position (after the capo) it will now sound like a G Major Barre Chord on the 3rd Fret.