B chord guitar diagrams and some other useful stuff
So let’s look at B chord guitar diagrams and some general pointers around this commonly used chord category.
There are many ways of playing the B Chord on guitar. I’ve covered a few of the most common versions of the B Chord to get you started.
Don’t forget to join the Fret Success Academy to get free lessons and tips, you can also buy the very cheap ebooks for sale in the Fret Success Online Store.
Most Common B Chord Guitar Variations
The most common forms of the B Chord on guitar are:
- B Major Chord;
- B Minor Chord;
- B7 Chord (Dominant 7);
- B Major 7 Chord;
- B5 Chord (Power Chord);
- B Sus4 Chord;
- B Sus2 Chord;
- B Minor 7 Chord;
- B Major Sixth (B6) Chord;
- B Diminished Chord; and
- B Diminished Seventh Chord.
There are many chord variations beyond the list above. These are a good starting point on your journey to learn the many ways to play the B Chord on guitar.
Let’s get started
In this lesson I’ve put together a huge list of B Chord Guitar Diagrams for you to get learning.
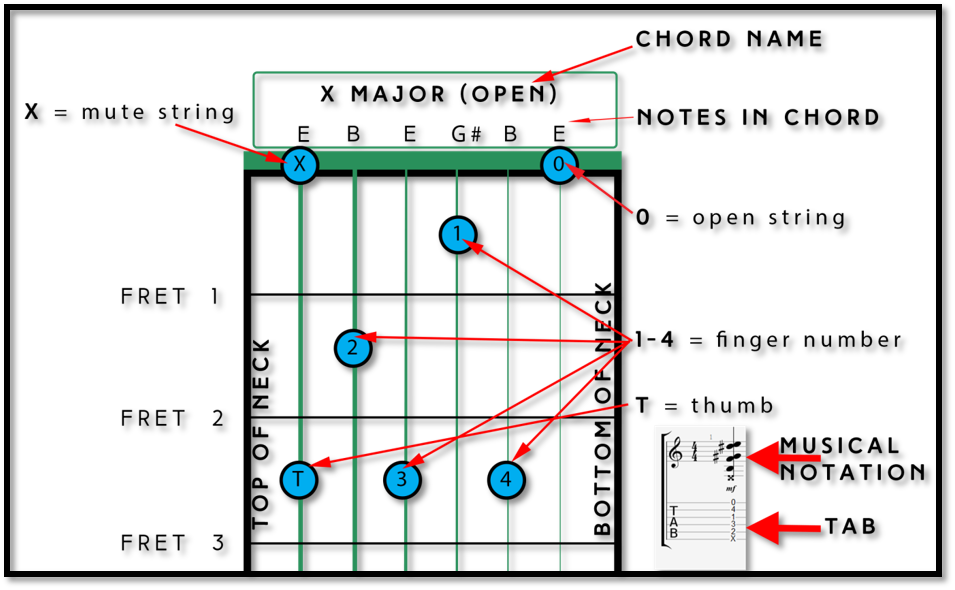
Here’s a little guide on getting the best from the guitar chords below, if you haven’t seen the Fret Success guitar chord diagrams before.
Chord diagrams are the easiest way to display how to arrange fretted notes to form guitar chords. They don’t normally indicate which fingers to use but the Fret Success chord diagrams make things simple.
There’s a quick guide on how to read our chord diagrams shown below, X major isn’t a chord; don’t worry, you’ve not gone mad!
Fret Success Chord Diagram Guide
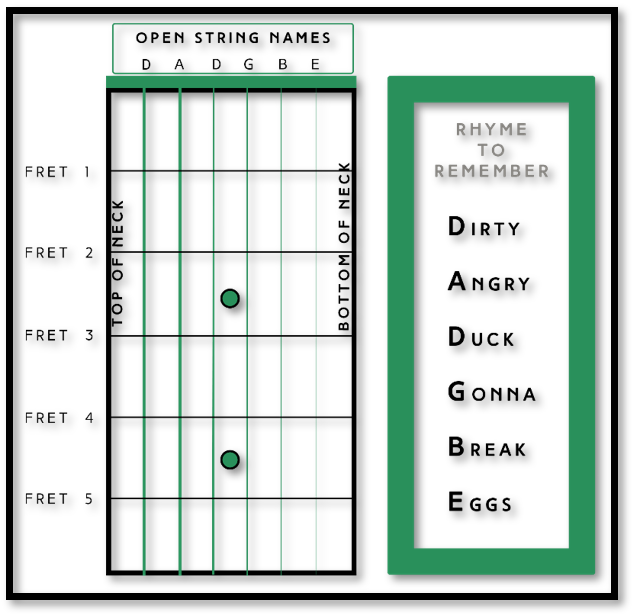
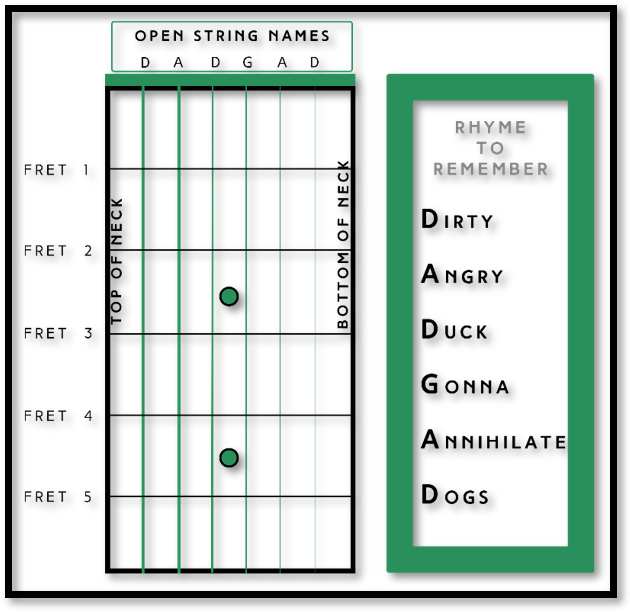
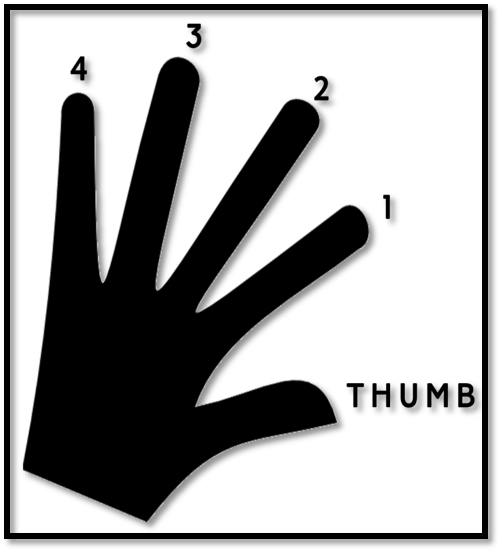
Guitar Finger Numbering Guide
Learn the notes as you go
The notes that make-up each chord will be given at the top of the guitar diagram, to help you learn these as you go along rather than just knowing the shapes. The notation and TAB are also given on the bottom right of the box.
Which finger goes where?
The number inside each blue circle indicates the finger that is used to fret each note in the chord. Open strings are indicated by a ‘0’, muted/un-played strings are indicated by an ‘X’ and ‘T’ indicates where the thumb comes over the back of the neck to play a note.
Which B Chord on Guitar?
So, what makes a B Major Chord on guitar? It’s not crucial to understand exactly why but I found it interesting to understand the wider picture when I learnt chords. Essentially, all chords on guitar come from a selection of notes in a scale. The first chords you will look to learn are major chords and this comes from the major scale.
That sounds complicated!!!
Don’t worry it’s not hard. It’s easy to get overwhelmed with technical words and musical terms but it’s quite easy once you grasp the basics. Here’s a little guide to help you along the way.
What is a scale?
A scale is a group of musical notes that relate to each other when heard in sequence or in order. They a separated by something called an “Interval”, which is the musical space between two notes.
Major? Minor? Diminished?
It’s easy to get confused between different chord type and scales but it’s easier than you think. Each chord has a description to let you know how it sounds, so you can find the same mood of chord in a different scale. For example, a B major chord and F major chord will sound very similar in terms of the emotion they give off (although a different pitch, the intervals between notes are similar). A major chord is a pleasant and positive sound. Whereas minor chords are more sad sounding and diminished chords are very dark and edgy sounding, used more commonly in metal and heavy rock music. Once you’ve learned the different chord qualities and how they sound you’ll be able to easily use them to figure out how to play songs or write your own. The following chord qualities are most common:
- Major and minor
- Major and minor seventh
- Dominant seventh
- Major and minor sixth
- Suspended fourth
- Ninth
- Diminished
- Augmented
You don’t need to learn all these now, just bare them in mind. You can get away with knowing the difference between major (happy) and minor (sad) to start with and then progress from there.
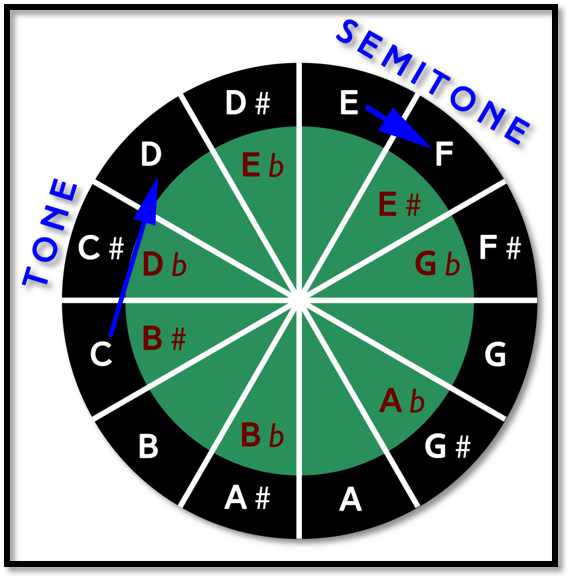
Chromatic Scale
There are a finite number of notes (12 in total) we can use in music known as the Chromatic Scale:

The ‘#’ symbol indicates a sharp note and the ‘b’ symbol represents a flat note. It’s not important to know the exact reasons for these, in the early stages of guitar. You just know they exist and be aware of them. Sharps and flats are interchangeable for certain notes i.e. A# is the same as Bb in that is the same note. However, they have different meanings depending on the scale they are in.
It’s an important concept to grasp that musical notes in the chromatic scale are not linear (i.e. in one line) but circular in a continuous pattern; increasing in pitch with no start or end.
What are musical intervals?
We already know this is the musical spacing between notes but what does that mean? The chromatic scale goes up in “semitones” (the smallest interval between notes). The easiest way to remember this is the change in pitch when you move up or down by one fret on the guitar; this is a semitone. Try doing this on your guitar, so you get an idea of how this sounds.
The next most common interval is the “tone” (sometimes known as whole note). This is easy to remember as it is a spacing/interval of two semitones. This is easy to get your head around if you think of it like a circle, i.e. two semi circles make a circle and so two semitones make a tone.
A musical scale is made up of a combination of a mix of tones and semi tones; depending on the type. Just know that if you remember the chromatic scale you won’t go far wrong. It might seem that there are so many scales that you don’t know where to even start learning and remembering them. All a musical scale is, is a selection of notes from the chromatic scale played either in order (traditional scale/arpeggio) or a chord (notes played at the same time).
Each type of scale has a different interval pattern between each note i.e. for major and minor. It’s easiest to initially think of the major scale pattern when you first start learning this.
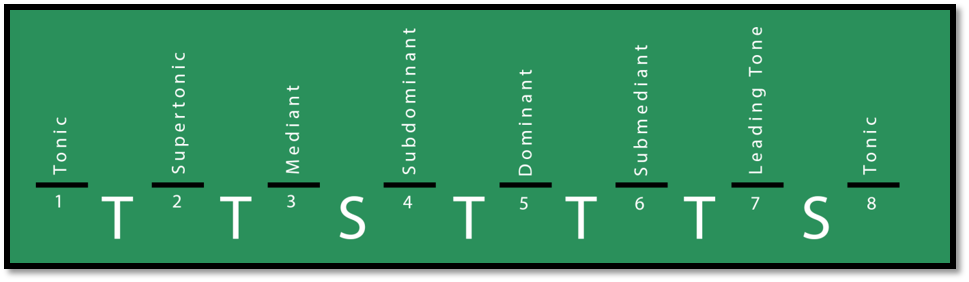
Major Scale Intervals and Pattern
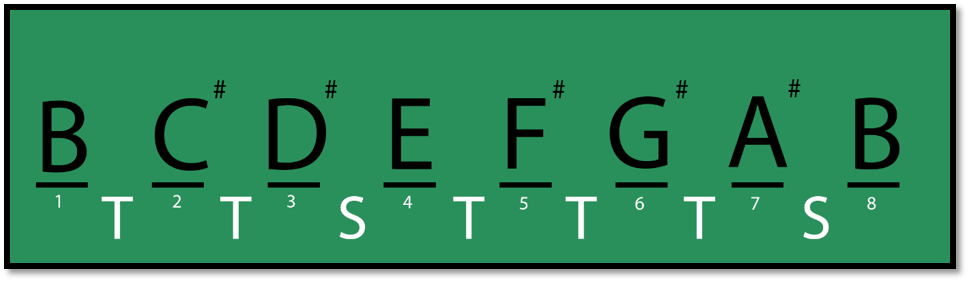
The intervals for a major scale, starting from the root, are: Tone; Tone; Semitone; Tone; Tone; Tone; and Semitone. Each note in the scale is also given a reference name which are the ‘Scale Degrees’ i.e. Tonic, Supertonic etc.
For example, B Major guitar scale contains the following notes:

So how does this help me when learning the B Chord on Guitar?
It’s easy to just learn a chord on the guitar and then carry on using it in the song your learning. But at some point, you’ll wish you’d learned a bit more about where these chords come from and how they relate to each other.
Whichever B chord on guitar you’re learning to play, it’s important and beneficial to understand that all chords come from the same origin. The fundamental chord of any form is the first, third and fifth notes of that scale. So, for example the B Major chord on guitar, the notes used are the first, third and fifth of the major scale. Using the diagram above, these are B, D# and F#. If we play just these three notes together, this is called a “triad” (dictionary definition: three similar things i.e. 3 notes from a scale).
We have up to six strings to use on the guitar. So, we try and make the most of these strings by doubling up on certain notes to make the chord (or triad) sound richer. The combination is dependent on the chord we’re playing and where we’re playing it. Now to those chords…
What is the difference between a barre chord and an open chord?
Before we start let’s establish the different between barre chords and open chords. A barre chord uses your first finger to fret across all or most of the strings on a single fret then build on this with additional fingers higher up the guitar neck.
An open chord is one that uses open strings or doesn’t use the barre technique.
Are you struggling to tune your guitar and taking ages to do it?
Before we get into the B Chord Guitar diagrams just take a minute to take a look at this guitar tuner. I use it everyday just to check if my guitar is in tune. The beauty of it is, that you can strum all your strings and it tells you which ones are out of tune. I can’t recommend it enough.
B Major Chord
The first chord you should look to learn is the B Major. This section gives you some B Chord guitar diagrams for some of the most common B Major guitar chord shapes.
There are several ways to play the B Major Chord on guitar. I’m going to go through the most commonly used ones below. Normally, when someone refers to the B Chord on Guitar, it’s the B Major guitar chord being referred to. As discussed above, the B Major Guitar Chord contains notes B, D# and F# at a minimum but the most common variations include many more notes, to make the most use of the available guitar strings.
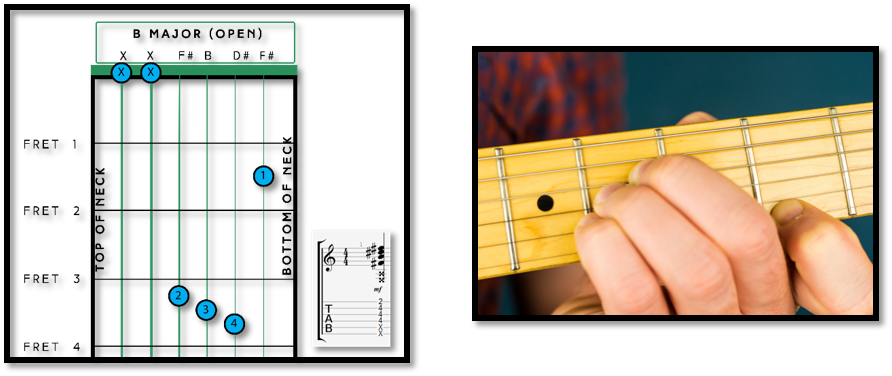
B Major Open Chord
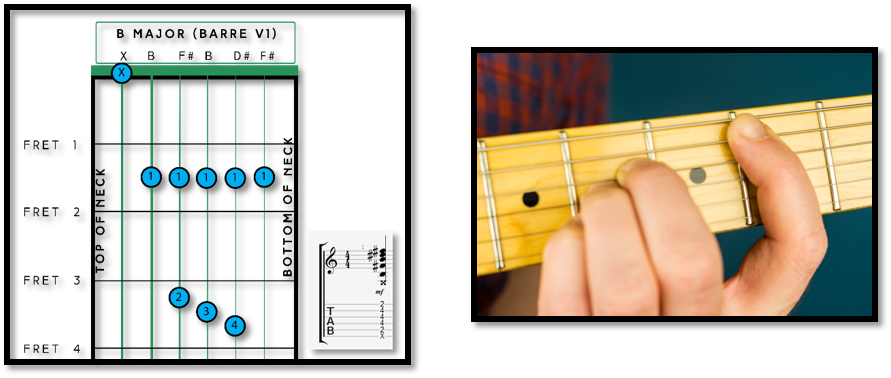
B Major Barre Chord V1
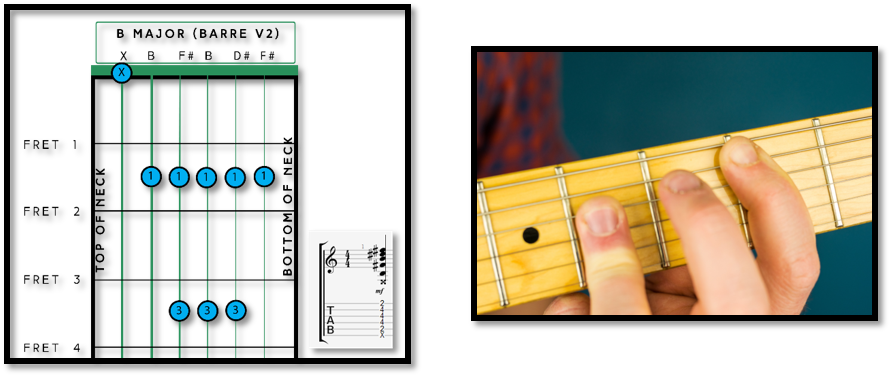
B Major Barre Chord V2
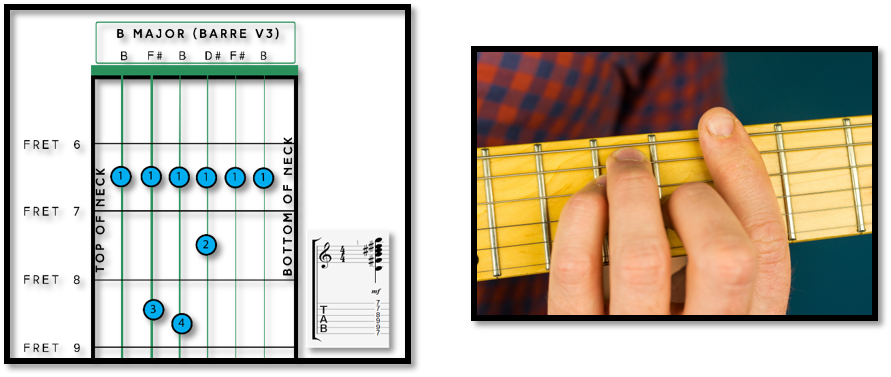
B Major Barre Chord V3
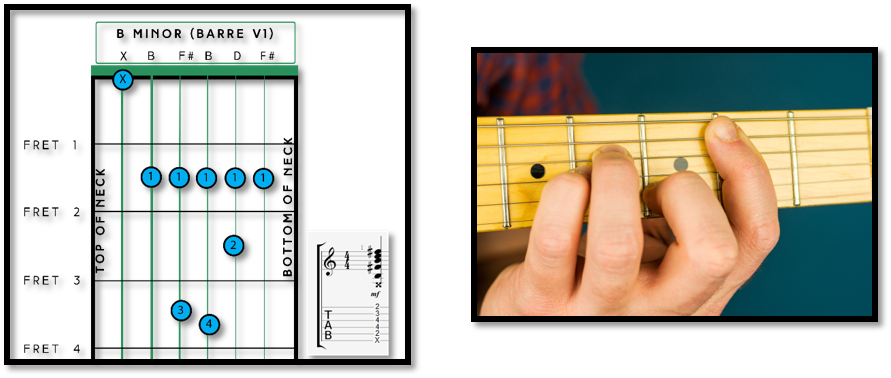
B Minor Chord
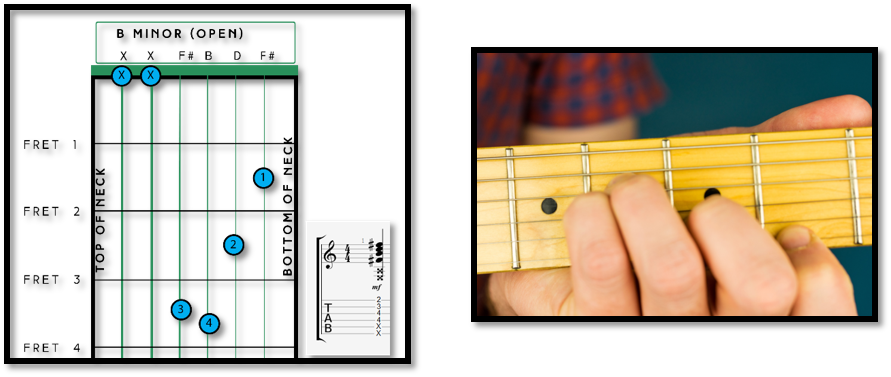
The next chord you should look to learn is the B Minor. This section gives you some B Chord guitar diagrams for some of the most common B Minor guitar chord shapes. The B Minor Guitar Chord contains notes B, D and F# at a minimum but the most common variations include many more notes, to make the most use of the available guitar strings. The easiest way to remember the difference between major and minor is that the major 3rd note (D# in B Major) is flattened by 1 semitone.
There are several ways to play the B Minor Chord on guitar. The diagrams below will help you get started.
B Minor Open Chord
B Minor Barre Chord V1
B Minor Barre Chord V2

Have you subscribed to the Fret Success Guitar Lessons YouTube Channel?
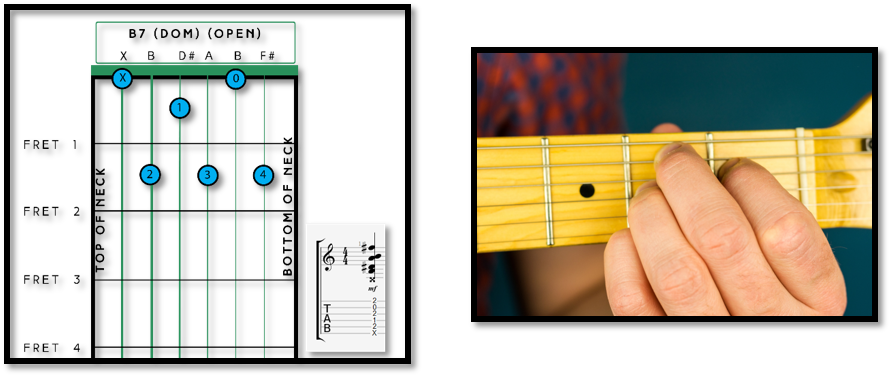
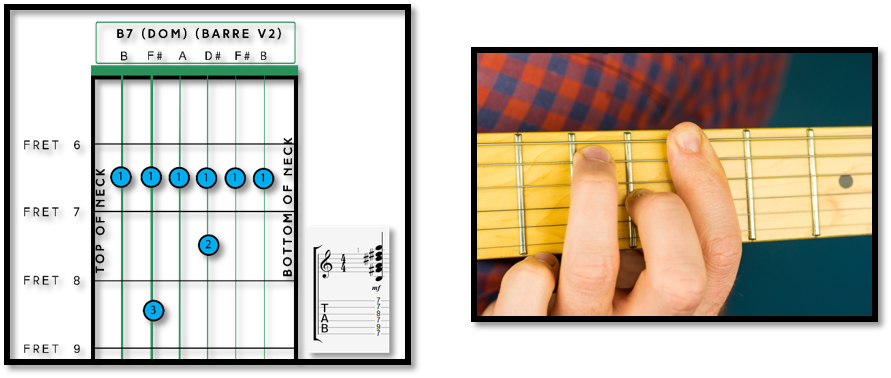
B7 Chord (Dominant 7)
Now you’ve mastered the first few B Chord guitar diagrams, the next is the B7 Dominant Chord. This section gives you some B Chord guitar diagrams for some of the most common B7 Dominant guitar chord shapes. The B7 Dominant Chord contains notes B, D#, F# and A at a minimum but the most common variations include more notes, to make the most use of the available guitar strings.
B7 Chord (Dominant 7) Open
B7 Chord (Dominant 7) Barre V1

B7 Chord (Dominant 7) Barre V2
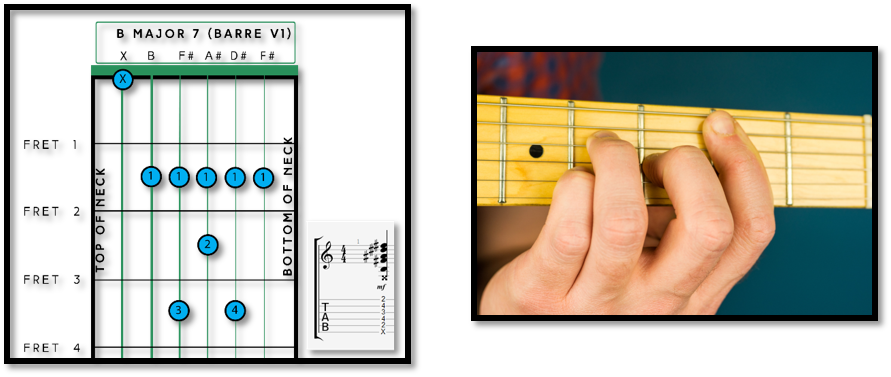
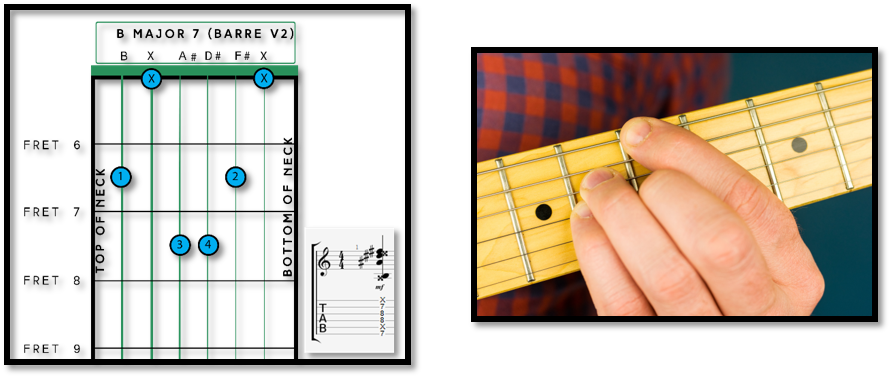
B Major 7 Chord
Let’s get a bit more involved, the next is the B Major 7 Chord. This section gives you some B Chord guitar diagrams for some of the most common B Major 7 guitar chord shapes. The B Major 7 Chord contains notes B, D#, F# and A# at a minimum.
B Major 7 Chord Barre V1
B Major 7 Chord Barre V2
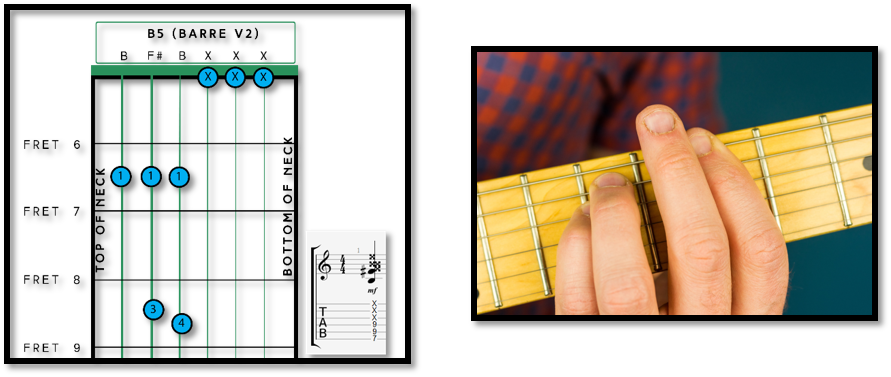
B5 Chord (Power Chord)
B5 Chord (Power Chord) V1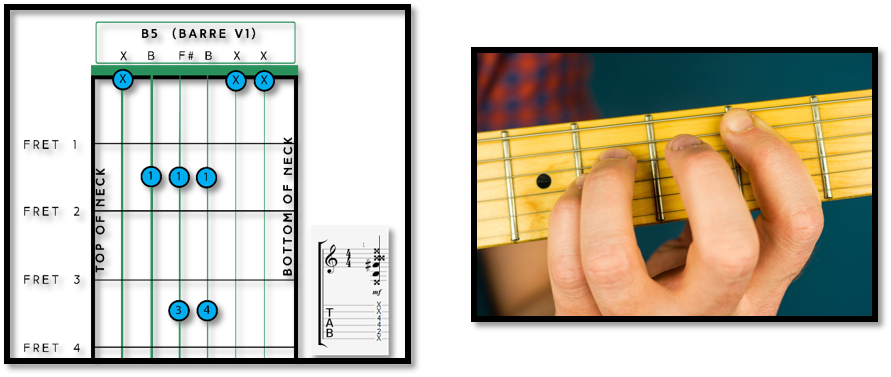
B5 Chord (Power Chord) V2
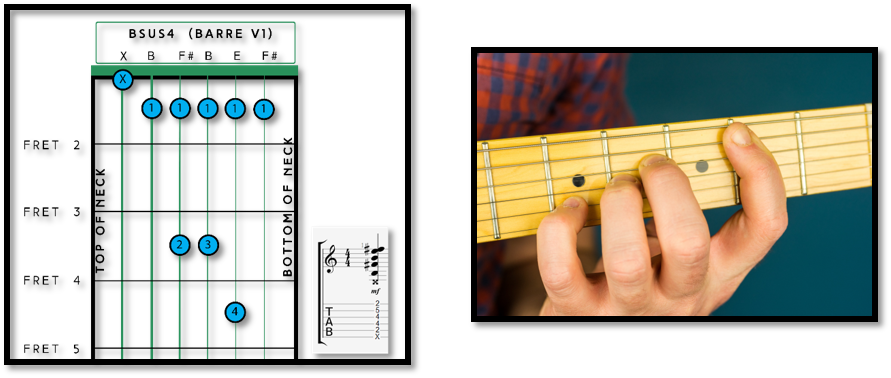
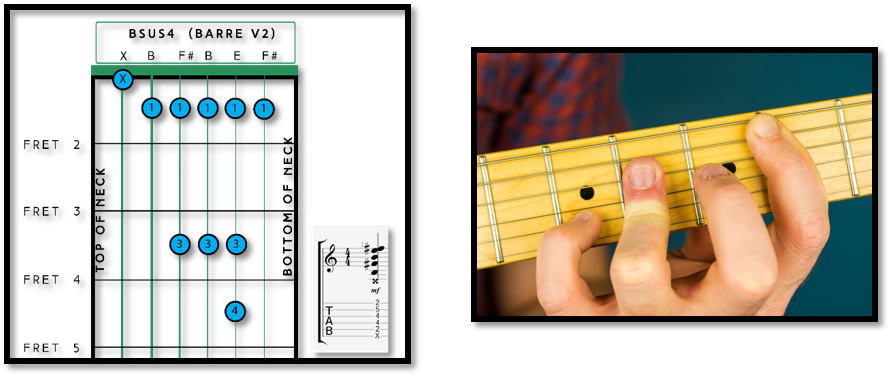
B Sus4 Chord
Bsus4 Chord Open

Bsus4 Chord Barre V1
Bsus4 Chord Barre V2
Bsus4 Chord Barre V3

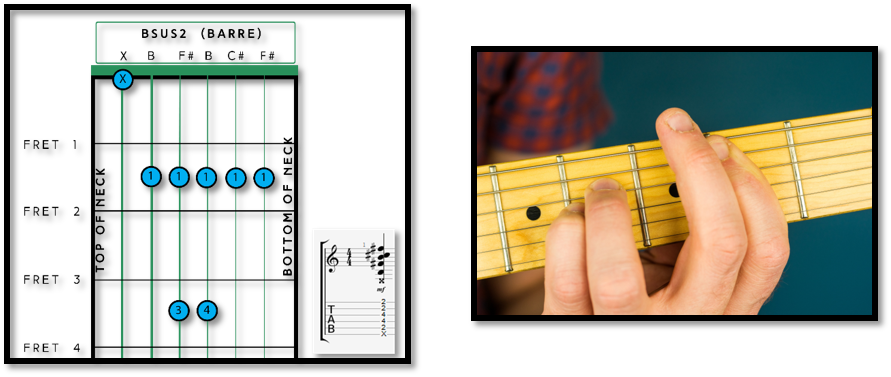
B Sus2 Chord
B Sus2 Chord Barre
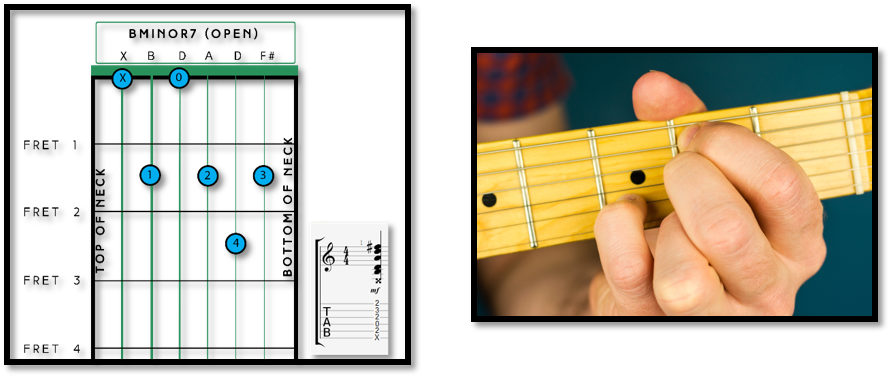
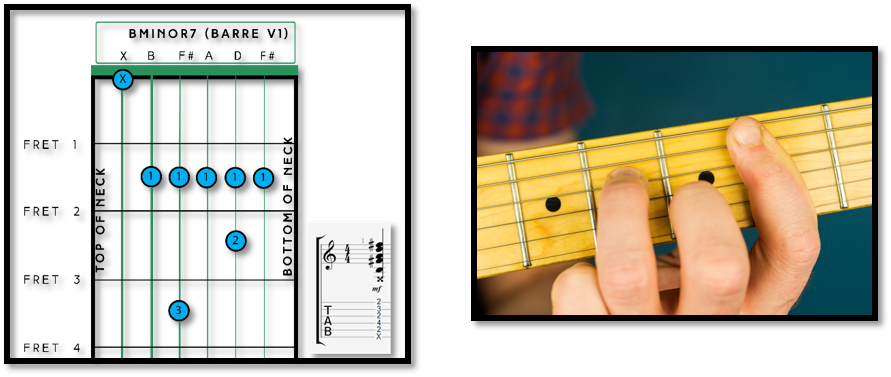
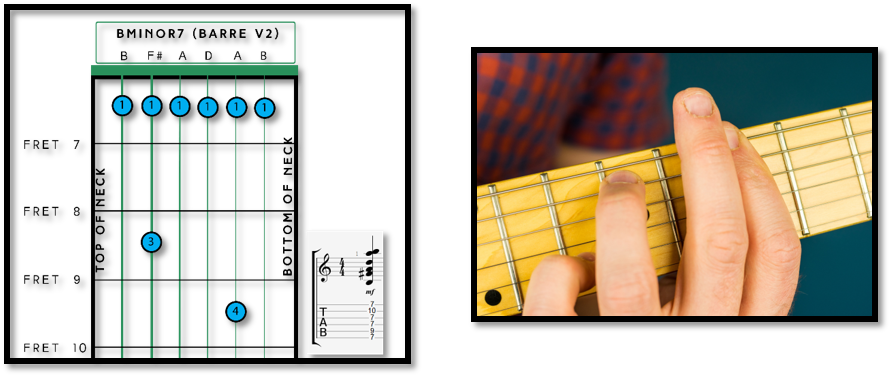
B Minor 7 Chord (Bm7)
B Minor 7 Chord Open
B Minor 7 Chord Barre V1
B Minor 7 Chord Barre V2
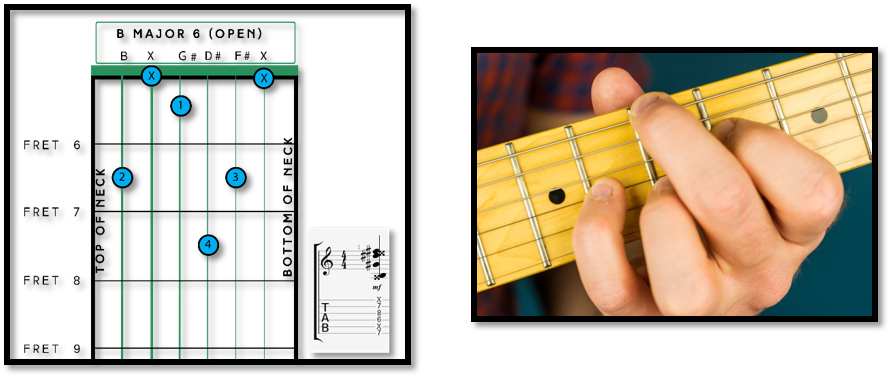
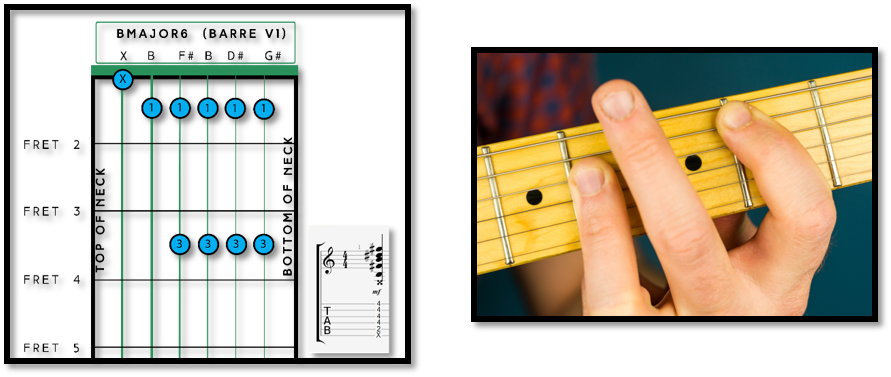
B Major Sixth Chord (B6)
B Major sixth open V1
B Major Sixth Barre
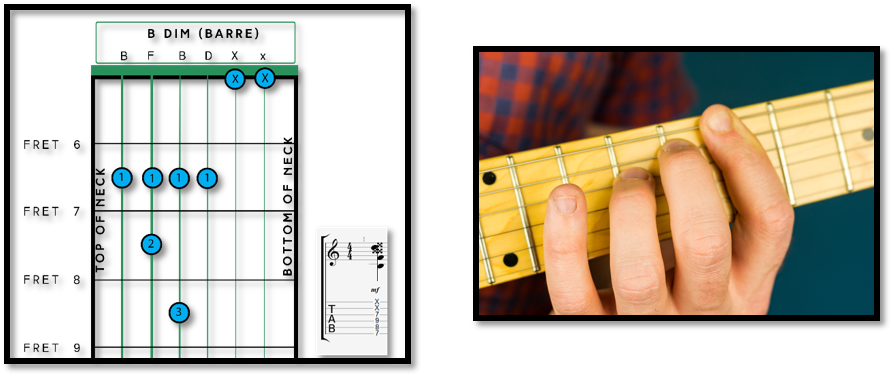
B Diminished Chord
B Diminished Chord open V1
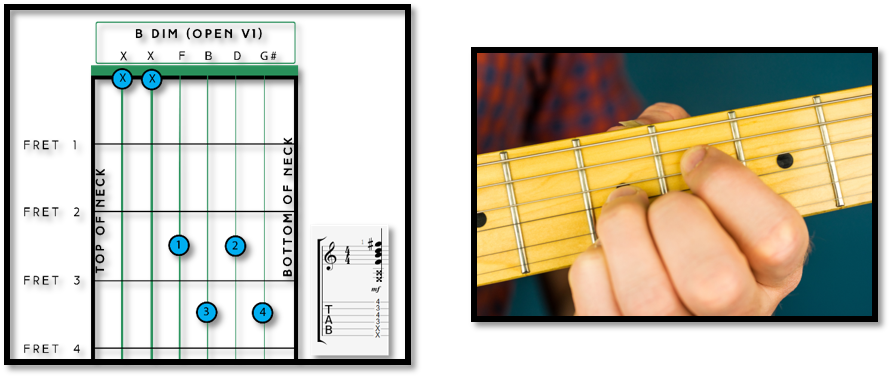
B Diminished Chord open V2

B Diminished Chord Barre
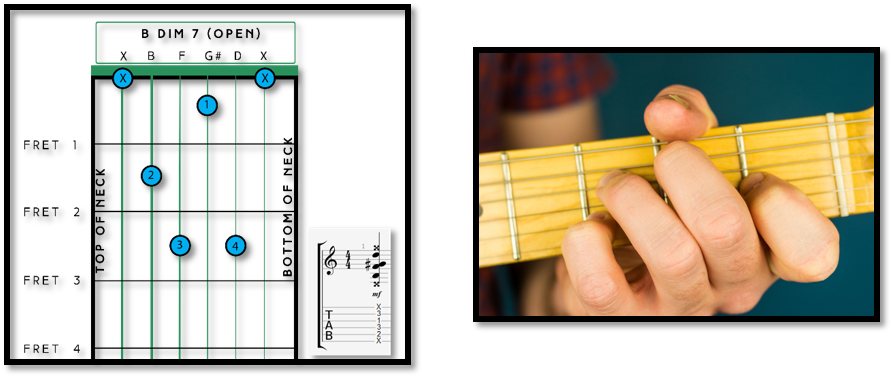
B Diminished Seventh Chord
B Diminished Seventh Chord Open V1
B Diminished Seventh Chord Open V2

Hope this has been useful and it helps you with learning to play guitar lessons.
Want to join the Fret Success Academy?
It’s free to join and you get instant access to all sorts of information, just like this. Head to https://fretsuccess.com/fret-success-academy/ to sign up!
Thanks for stopping by and see you soon.
Cheers,
Dan
Founder
Fret Success
https://www.fretsuccess.com


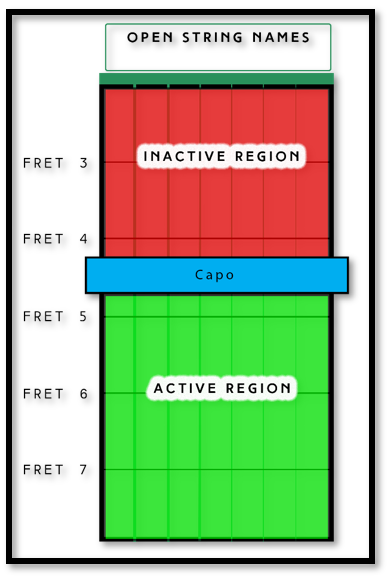
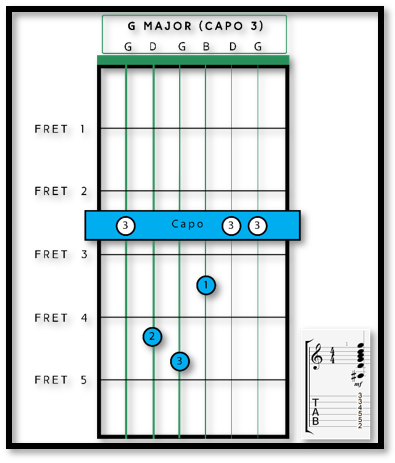
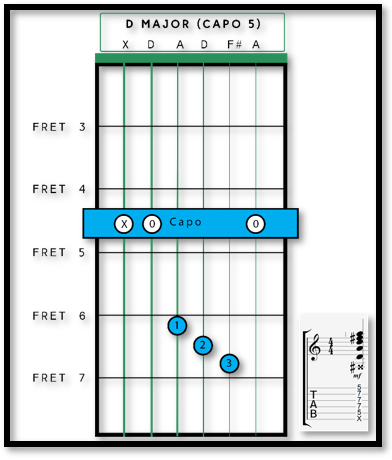
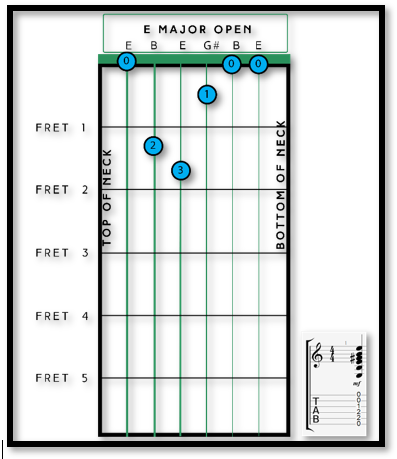 For example, if we want to move our chords up by 3 semitones then we would place the capo on the 3rd fret of the guitar to correctly shift the open strings to the desired relative tuning. If we form an E Major Open Chord shape in this position (after the capo) it will now sound like a G Major Barre Chord on the 3rd Fret.